Introduction
Preparing for the ICSE Class 10 Physics examination? These Refraction Through a Lens Notes are designed to help you understand every important concept in a simple and exam-oriented manner. The notes cover all the essential topics from Chapter 5 – Refraction Through a Lens, including ray diagrams, lens formula, sign convention, magnification, power of a lens, image formation, and previous years’ important concepts.
Whether you are revising before your board examination or studying the chapter for the first time, these notes will make learning easier with concise explanations and well-organized content.
Study Support by Rohit Academy
Rohit Academy offers expert-curated ICSE Class 10 Physics Study Materials including ICSE Refraction Through a Lens Chapter Notes, diagrams, and key formulas for better understanding.
Study materials related to chapter 5: Refraction Through a Lens
Section (A) : Lens and Refraction of Light Through a Lens
What is a Lens?
A lens is a transparent refracting medium bounded by two spherical surfaces or one spherical surface and one plane surface, which refracts light to form images.
Types of Lenses
There are two types of lenses:
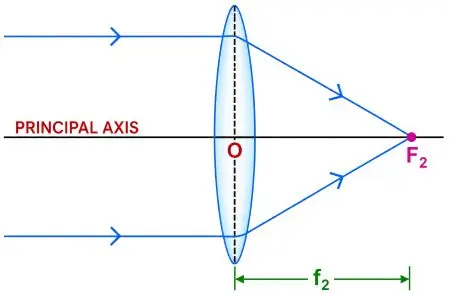
1. Convex Lens (Converging Lens)
A convex lens is:
- Thick at the centre
- Thin at the edges
- Converges parallel rays of light to a point
Hence, it is also called a converging lens.
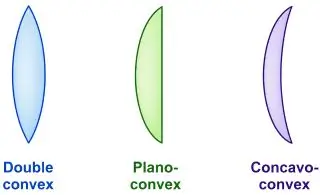
Types of Convex Lens
- Bi-convex (Double Convex)
- Plano-convex
- Concavo-convex

2. Concave Lens (Diverging Lens)
A concave lens is:
- Thin at the centre
- Thick at the edges
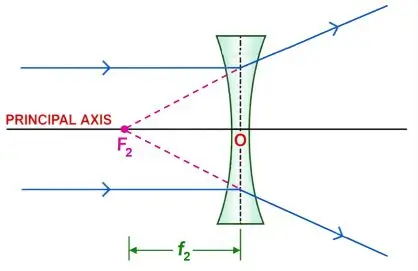
- Diverges parallel rays of light,
Hence, it is called a diverging lens.
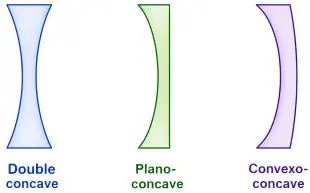
Types of Concave Lens
- Bi-concave (Double Concave)
- Plano-concave
- Convexo-concave
Lens as a Set of Prisms
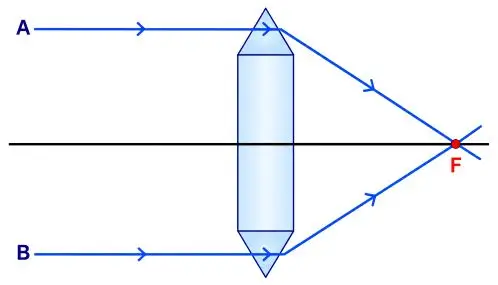
A lens can be considered as a combination of many small prisms.
Convex Lens
- Upper part bends light downward.
- Lower part bends light upward.
- Central portion behaves like a glass slab.
- Parallel rays meet at one point.
Result: Convex lens converges light.
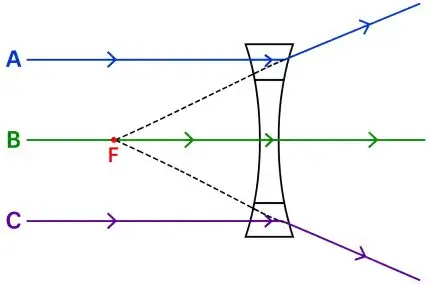
Concave Lens
- Upper prism bends rays upward.
- Lower prism bends rays downward.
- Central portion acts like a glass slab.
- Rays spread apart.
Result: Concave lens diverges light.
Technical Terms Related to a Lens
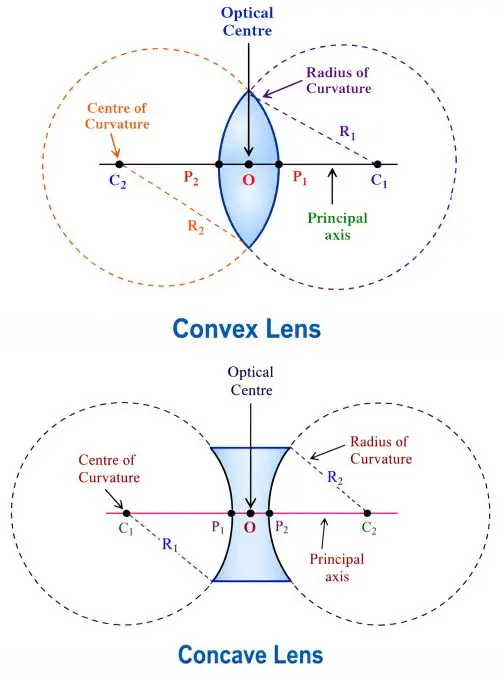
1. Centre of Curvature (C1 and C2)
Each spherical surface of a lens is a part of a sphere.
The centre of that sphere is called the centre of curvature.
A lens has two centres of curvature.
2. Radius of Curvature (R)
The radius of the sphere of which the lens surface forms a part is called the radius of curvature.
For an equi-convex or equi-concave lens:
Radius of first surface = Radius of second surface
3. Principal Axis
The straight line joining the two centres of curvature is called the principal axis.
4. Optical Centre (O)
The point on the principal axis through which a ray of light passes without deviation (for a thin lens) is called the optical centre.
5. Principal Focus
A lens has two principal foci because light can travel in either direction.
First Principal Focus (F1)
Convex Lens
The point from which rays originate and become parallel after refraction.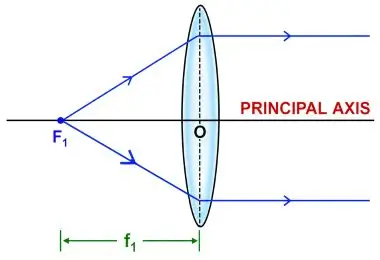
Concave Lens
The point towards which incident rays appear to meet before becoming parallel after refraction.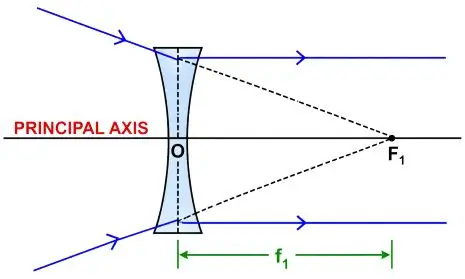
Second Principal Focus (F2)
Convex Lens
The point where rays parallel to the principal axis meet after refraction.
Concave Lens
The point from which parallel rays appear to diverge after refraction.
6. Focal Plane
A plane passing through the focus and perpendicular to the principal axis is called the focal plane.
Every lens has:
- First focal plane
- Second focal plane
7. Focal Length (f)
The distance between the optical centre and the principal focus is called the focal length.
There are two focal lengths:
- First focal length (OF1)
- Second focal length (OF2)
If the medium on both sides is the same,
F1 = f2
Real and Virtual Focus
Convex Lens
- Has a real focus
- Parallel rays actually meet after refraction.
Concave Lens
- Has a virtual focus
- Rays only appear to diverge from the focus.
Oblique Parallel Beam
When parallel rays fall obliquely:
Convex Lens
The rays meet at a point on the second focal plane, not at the principal focus.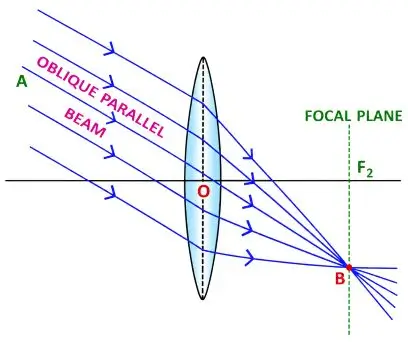
Concave Lens
The rays appear to diverge from a point on the second focal plane.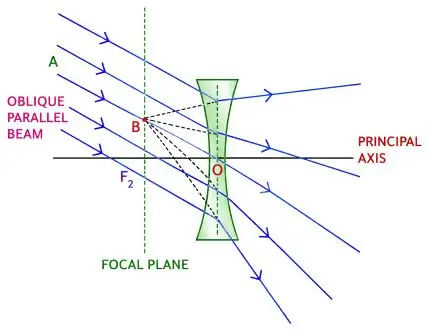
Factors Affecting Focal Length
The focal length depends on:
1. Refractive Index
- Higher refractive index → Smaller focal length.
- If a lens is placed in water instead of air, its focal length increases.
2. Radius of Curvature
- Greater curvature (thicker lens) → Shorter focal length.
- Less curvature (thinner lens) → Longer focal length.
What Happens if Part of the Lens is Covered?
If part of a lens is covered:
- Focal length remains unchanged.
- Image position remains unchanged.
- Image size remains unchanged.
- Image nature remains unchanged.
- Brightness of the image decreases.
Refraction Through a Lens
A ray of light is refracted twice:
- At the first surface (air → glass)
- At the second surface (glass → air)
The total deviation is the sum of deviations at both surfaces.
Section (B) : Formation of Image By a Lens
Principal Rays Used in Ray Diagrams
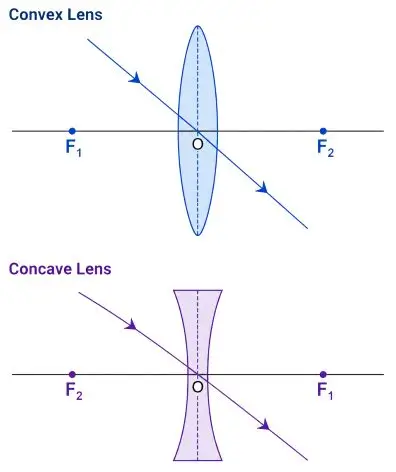
❖ Rule 1: Through the Optical Centre
- A ray passing through the optical centre (O) passes undeviated.
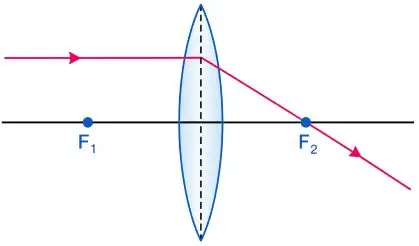
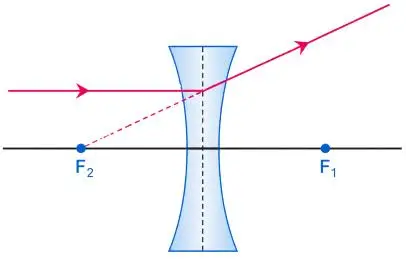
❖ Rule 2: Parallel to the Principal Axis
- In a convex lens: A ray parallel to the principal axis after refraction passes through second focus (F2).
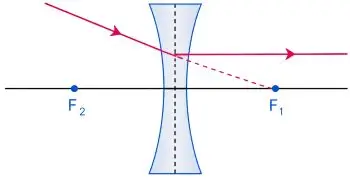
- In a concave lens: A ray parallel to the principal axis after refraction appears to be coming from the second focus (F2).
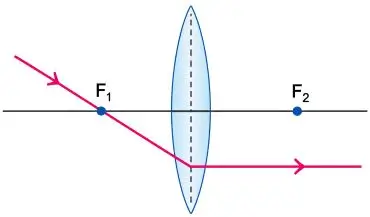
❖ Rule 3: Through (or Towards) the First Focus
- In a convex lens: A ray passing through focus after refraction becomes parallel to the principal axis.
- In a concave lens: A ray appears to be going towards focus after refraction becomes parallel to the principal axis.
Types of Images
There are two kinds of images.
1. Real Image
A real image is formed when refracted rays actually meet.
Characteristics
- Can be obtained on a screen
- Usually inverted
- Formed by a convex lens (except when the object is within the focal length)
2. Virtual Image
A virtual image is formed when refracted rays appear to meet after extending them backward.
Characteristics
- Cannot be obtained on a screen
- Erect (upright)
- Seen directly by the eye
Difference Between Real and Virtual Image
| Real Image | Virtual Image |
| Formed when refracted rays actually meet. | Formed when refracted rays appear to meet |
| Can be obtained on a screen | Cannot be obtained on a screen |
| Inverted | Erect |
| Usually formed by a convex lens | Formed by a concave lens and convex lens (object within focus) |
Image Formation by a Convex Lens
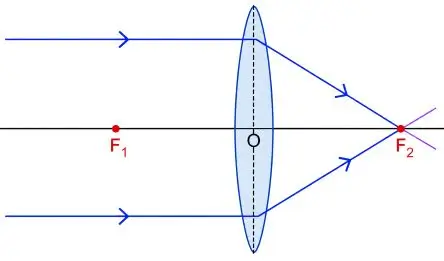
Case 1: Object at Infinity (𝑢 = ∞)
- Position of Image: At the second principal focus (F2).
- Nature of image: Real and Inverted
- Size of image: Highly diminished (point-sized)
- Ray diagram:
- Applications
- Burning glass
- Camera lens
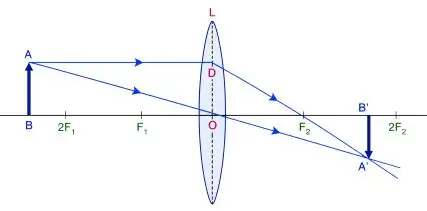
Case 2: Object Beyond 2F1 (𝑢 > 2𝑓)
- Position of Image: Between F2 and 2F2.
- Nature of image: Real and Inverted
- Size of image: Diminished
- Ray diagram:
- Application
- Camera for photographing distant objects.
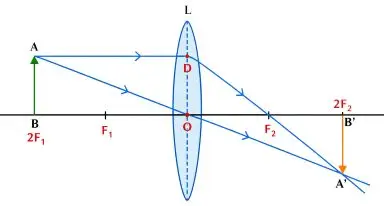
Case 3: Object at 2F1 (u = 2f)
- Position of Image: At 2F2
- Nature of image: Real and Inverted
- Size of image: Same size as the object
- Ray diagram:
- Application
- Objective lens of a terrestrial telescope.
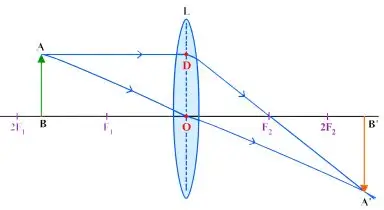
Case 4: Object Between F1 and 2F1
- Position of Image: Beyond 2F2.
- Nature of image: Real and Inverted
- Size of image: Magnified
- Ray diagram:
- Applications
- Slide projector
- Cinema projector
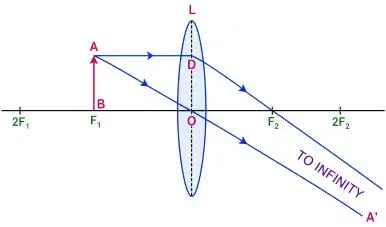
Case 5: Object at F1 (𝑢 = 𝑓)
- Position of Image: At infinity.
- Nature of image: Real and Inverted
- Size of image: Highly magnified
- Ray diagram:
- Application
- Collimator in a spectrometer.
Case 6: Object Between Lens and F1 (𝑢 < 𝑓)
- Position of Image: On the same side of the lens as the object.
- Nature of image: Virtual and erect
- Size of image: Magnified
- Ray diagram:
- Applications
- Magnifying glass
- Reading lens
- Simple microscope
Summary Table for Convex Lens
| Position of Object | Position of Image | Nature | Size | Application |
| At infinity | At F2 | Real, inverted | Highly diminished | Burning glass |
| Beyond 2F1 | Between F2 and 2F2 | Real, inverted | Diminished | Camera |
| At 2F1 | At 2F2 | Real, inverted | Same size | Telescope |
| Between F1 and 2F1 | Beyond 2F2 | Real, inverted | Magnified | Projector |
| At F1 | At infinity | Real, inverted | Highly magnified | Collimator |
| Between O and F1 | Same side of lens | Virtual, erect | Magnified | Magnifying glass |
Important Observations for a Convex Lens
- As the object moves from infinity towards 2F1, the image becomes larger.
- At 2F1, the image is equal in size to the object.
- Between F1 and 2F1, the image is magnified.
- At F₁, the image is formed at infinity.
- Between the optical centre and F1, the image becomes virtual and erect.
Image Formation by a Concave Lens
A concave lens always forms:
- Virtual image
- Erect image
- Diminished image
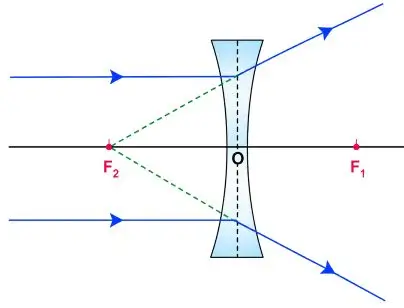
Case 1: Object at Infinity
- Position of Image: At F2 (same side as object)
- Nature of Image: Virtual and erect
- Size of Image: Highly diminished
- Ray diagram:
- Application: Galilean telescope.
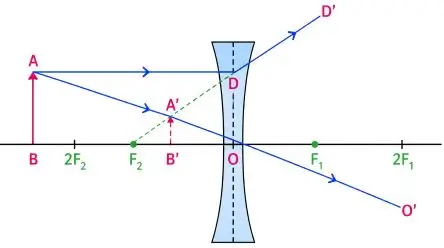
Case 2: Object at Any Finite Distance
- Position of Image: Between the optical centre (O) and the focus (F2)
- Nature of Image: Virtual and erect
- Size of image: Diminished
- Ray diagram:
- Application: Spectacles for correcting myopia (short-sightedness).
Important Observations for a Concave Lens
- The image is always virtual.
- The image is always erect.
- The image is always smaller than the object.
- The image is always formed between the optical centre and the focus.
- As the object approaches the lens, the image shifts towards the optical centre and becomes slightly larger, but it always remains diminished.
Summary Table for Concave Lens
| Position of Object | Position of Image | Nature | Size | Application |
| At infinity | At focus (same side) | Virtual, erect | Highly diminished | Galilean telescope |
| Any finite distance | Between focus and optical centre | Virtual, erect | Diminished | Spectacles for myopia |
Difference Between Images Formed by Convex and Concave Lenses
| Convex Lens | Concave Lens |
| Forms real or virtual images | Always forms virtual images |
| Image may be magnified, same size, or diminished | Image is always diminished |
| Image may be erect or inverted | Image is always erect |
| Image position depends on object position | Image is always on the same side as the object |
Important Applications of Lenses
Convex Lens
- Magnifying glass
- Camera lens
- Slide projector
- Cinema projector
- Burning glass
- Microscope
- Telescope
- Spectrometer collimator
Concave Lens
- Spectacles for myopia (short-sightedness)
- Galilean telescope
Section (C) : Sign Convention and Lens Formula
Cartesian Sign Convention for Lenses
To solve numerical problems involving lenses, we follow the Cartesian Sign Convention.
Rules of Sign Convention
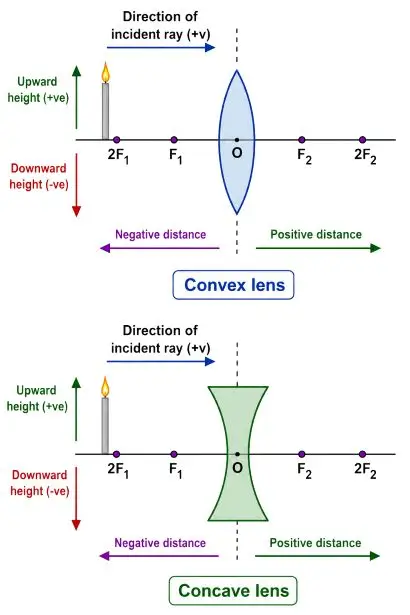
- The optical centre (O) of the lens is taken as the origin.
- All distances are measured from the optical centre.
- Distances measured to the right of the optical centre (along the positive x-axis) are positive (+).
- Distances measured to the left of the optical centre (along the negative x-axis) are negative (−).
- Heights measured above the principal axis (along the positive y-axis)are positive.
- Heights measured below the principal axis (along the negative y-axis) are negative.
Sign Convention Table
| Quantity | Convex Lens | Concave Lens |
| Object distance (u) | − ve | − ve |
| Object size (h1) | + ve | + ve |
| Image distance (v) |
| − ve |
| Image size (h2) |
| + ve |
| Focal length (f) | + ve | − ve |
Important Sign Convention Tips
- The object is always placed on the left side of the lens.
- Therefore, object distance (u) is always negative.
- A real image is formed on the right side of the lens, so v is positive.
- A virtual image is formed on the same side as the object, so v is negative.
- A convex lens has a positive focal length.
- A concave lens has a negative focal length.
Lens Formula
Where,
- v = image distance
- u = object distance
- f = focal length
Note: Use the correct sign convention while solving numerical problems.
Linear Magnification
Magnification tells us how much larger or smaller the image is compared to the object.
Formula:
Where,
- m = Magnification
- v = Image distance
- u = Object distance
- h2 = height of image
- h1 = height of object
Sign of Magnification
| Magnification | Image | Magnification |
| − ve | Real and inverted | − ve |
| + ve | Virtual and erect | + ve |
***Note
Magnification for concave lens is always positive.
Magnification Values
| Value of m | Image Size |
| m > 1 | Magnified |
| m = 1 | Same size |
| m < 1 | Diminished |
Key points:
Convex Lens
- Can form both real and virtual images.
- Magnification may be positive or negative.
- The image may be magnified, diminished, or the same size.
Concave Lens
- Always forms a virtual, erect, and diminished image.
- Magnification is always positive.
- The value of magnification is always less than 1.
Power of a Lens
The power of a lens is the reciprocal of its focal length.
- Formula (when focal length is in metres):
- Formula (when focal length is in centimetres):
Where:
- P = Power of the lens (Dioptre, D)
- f = Focal length
Important Facts
- Power is inversely proportional to focal length.
- A short focal length means greater power.
- A long focal length means lower power.
- The SI unit of power is the Dioptre (D).
One Dioptre
One dioptre is the power of a lens having a focal length of 1 metre.
1 D = 1 m−1
Sign of Power
- Convex lens: Positive (+)
- Concave lens: Negative (−)
Section (D) : Magnifying Glass and Application of Lenses
Magnifying Glass (Simple Microscope)
Definition
A magnifying glass is a convex lens of short focal length used to obtain a magnified virtual image of a small object.
Principle
- The least distance of distinct vision for a normal eye is 25 cm.
- Small objects appear larger when placed close to the eye.
- A convex lens helps form a magnified image that subtends a larger angle at the eye.
- The object is placed between the optical centre (O) and principal focus (F1).
Construction
A simple microscope consists of:
- Convex lens of short focal length
- Lens holder
- Handle or frame
Characteristics of Image
- Virtual
- Erect
- Magnified
- On the same side of the lens
Ray diagram:
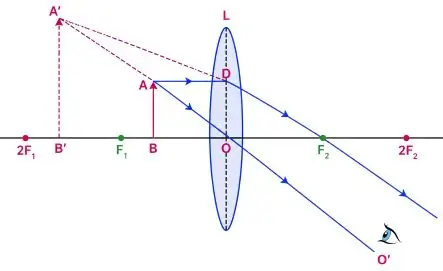
Working:
- The object is kept between O and F1.
- One ray passes through the optical centre without deviation.
- Another ray parallel to the principal axis passes through focus F₂ after refraction.
- The refracted rays appear to meet when extended backward.
- Thus, a virtual enlarged image is formed.
Magnifying Power
The magnifying power is given by:
Where,
- M = Magnifying power
- D = Least distance of distinct vision = 25 cm
- f = Focal length of convex lens
Important Points
- Smaller focal length → Greater magnifying power.
- Magnifying power cannot be increased indefinitely.
Uses of a Magnifying Glass
- Reading small letters
- Watch repairing
- Jewellery work
- Scientific instruments
- Inspecting tiny objects
- Reading scales in laboratory instruments
Difference Between Convex and Concave Lens
| Convex Lens | Concave Lens |
| Thick at the centre | Thin at the centre |
| Converges light | Diverges light |
| Positive focal length | Negative focal length |
| Positive power | Negative power |
| Can form real or virtual images | Always forms virtual images |
| Used as magnifying glass | Used in spectacles for myopia |
Applications of Lenses
- Uses of Convex Lens
- Camera objective.
- Telescope objective.
- Slide projector.
- Human eye lens.
- Magnifying glass.
- Spectroscope collimator.
- Uses of Concave Lens
- Spectacles for myopia (short-sightedness).
- Objective lens in Galilean telescope.
- Spectacles for myopia (short-sightedness).
Spectacles
❖ Hypermetropia (Long-sightedness)
- Cannot see nearby objects clearly.
- Correction: Convex lens
❖ Myopia (Short-sightedness)
- Cannot see distant objects clearly.
- Correction: Concave lens
❖ Bifocal Lens
Used for persons suffering from both myopia and hypermetropia.
- Upper part → Concave lens (distance vision)
- Lower part → Convex lens (near vision)
Experimental Determination of Focal Length of a Convex Lens
Method 1: Distant Object Method
Principle
Parallel rays from a distant object converge at the principal focus of a convex lens.
Procedure
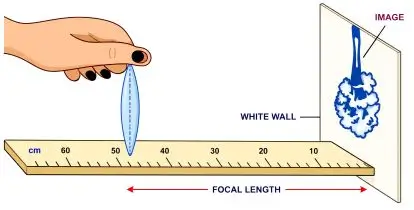
- Place a metre scale facing a white wall.
- Hold the convex lens vertically.
- Focus the image of a distant object on the wall.
- Measure the distance between the lens and the wall.
- This distance gives the approximate focal length.
Method 2: Auxiliary Plane Mirror Method
Apparatus
- Convex lens
- Plane mirror
- Pin
- Vertical stand
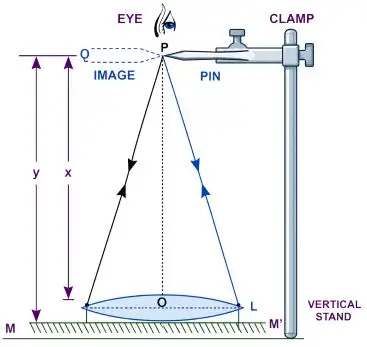
Procedure
- Place the lens on a plane mirror.
- Adjust the pin vertically above the lens.
- Remove parallax.
- Measure:
- x = Distance of pin from lens
- y = Distance of image from mirror
- Calculate focal length.
Formula:
Take three readings and calculate the mean value.
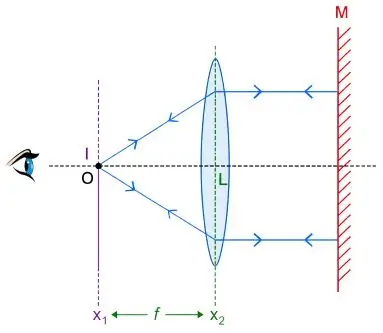
Method 3: Optical Bench Method
Apparatus
- Optical bench
- Convex lens
- Plane mirror
- Object pin
Procedure
- Place the lens close to the mirror.
- Move the object pin until its image coincides with it.
- Note:
- Object position = x1
- Lens position = x2
Formula:
How to Identify a Lens
(i) By touching
If the lens is thick in the middle and thin at the edges, the lens is convex and if the lens is thin in the middle and thick at the edges, the lens is concave.
(ii) By seeing the image
- On keeping the lens near a printed page, if letters appear magnified, the lens is convex and if the letters appear diminished, the lens is concave.
- On seeing a distant object through the lens, if its inverted image is seen, the lens is convex and if an upright image is seen, the lens is concave.
Important Formulae – Refraction Through a Lens
1. Lens Formula:
2. Magnification:
3. Power of Lens:
- (f in metre)
- (f in cm)
4. Magnifying Power:
ICSE Class 10 Physics Chapter 5 Refraction Through a Lens Notes PDF Download
Students can download the ICSE Class 10 Physics Chapter 5 Refraction Through a Lens Notes PDF for offline study and quick revision. The PDF is useful for last-minute preparation and helps you revise the complete chapter anytime.
Who Can Use These Notes?
These notes are useful for:
- ICSE Class 10 students
- Teachers preparing classroom material
- Students revising for board examinations
- Anyone looking for concise Physics notes on lenses
Study regularly, practise ray diagrams and numericals, and revise the important formulas to score excellent marks in the ICSE Physics examination.
For more ICSE study materials, chapter-wise notes, previous year questions, Selina Solutions, and free PDF downloads, keep visiting Rohit Academy – www.rohitacademy.in.
You can also visit:
ICSE Class 10 Physics Notes
| ☛ ICSE Class 10 Physics Chapter 1 – Force Notes |
| ☛ ICSE Class 10 Physics Chapter 2 – Work, Energy and Power Notes |
| ☛ ICSE Class 10 Physics Chapter 3 – Machines Notes |
| ☛ ICSE Class 10 Physics Chapter 4 – Refraction of Light at Plane Surfaces Notes |
| ☛ ICSE Class 10 Physics Chapter 5 – Refraction through Lens Notes Notes |
| ☛ ICSE Class 10 Physics Chapter 6 – Spectrum Notes |
| ☛ ICSE Class 10 Physics Chapter 7 – Sound Notes |
| ☛ ICSE Class 10 Physics Chapter 8 – Current Electricity Notes |
| ☛ ICSE Class 10 Physics Chapter 9 – Electrical Power and Household Circuits Notes |
| ☛ ICSE Class 10 Physics Chapter 10 – Electro-magnetism Notes |
| ☛ ICSE Class 10 Physics Chapter 11 – Calorimetry Notes |
| ☛ ICSE Class 10 Physics Chapter 12 – Radioactivity Notes |
Official Website:
Students can visit the official CISCE website for more details and updates.